

- iOS
- Android
- Prerequisites
- Download the required files
- Install the downloaded files
- Sample Code
-
API Documentation
- Change Header theme
- Change Screen Background
Theme - Change Back Button theme on Header
- Change List theme
- Change Text Notification Detail
View theme - Change Event Notification Detail
View theme - Change Photos & Videos
Notification Detail View theme - Change Newsletter Notification
Detail View theme - Change Document Notification
Detail View theme - Change Survey Notification
Detail View theme
Setup APNS Certificate
Apple Push Notification Service (APNS) needs a certificate.
Each app group will require a different APNS Certificate.
To enable push notifications in your app, it needs to be signed with a provisioning profile that is configured for push. Follow the steps below to create an APNS certificate for the app group. This certificate will need to be uploaded to your app group to enable your app to receive push notifications via the XNotify engine.
Generate the Certificate Signing Request (CSR)
Digital certificates are based on public-private key cryptography. You don't need to know anything cryptography to use certificates, but you do need to be aware that a certificate always works in combination with a private key.
The certificate is the public part of this key pair. It is safe to give it to others, which is exactly what happens when you communicate over SSL. The private key, however, should be kept… private. It's a secret. Your private key is nobody's business but your own. It is important to know that you can't use the certificate if you don't have the private key.
Whenever you apply for a digital certificate, you need to provide a Certificate Signing Request, or CSR for short. When you create the CSR, a new private key is made, that is put in your keychain. You then send the CSR to a certificate authority (in this case that is the iOS developer portal), which will generate the SSL certificate for you based on the information in the CSR.
Open Keychain Access on your Mac (it is in Application/Utilities) and choose the menu option "Request a Certificate from a Certificate Authority".
If you do not have this menu option or it says "Request a Certificate from Certificate Authority with key", then download and install the WWDR Intermediate Certificate first. Also make sure no private key is selected in the main Keychain Access window. You should now see the following window:
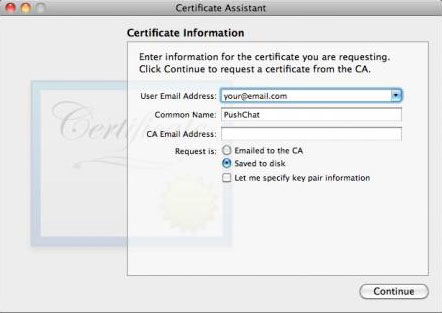
Enter your email address here. I've heard people recommended you use the same email address that you used to sign up for the iOS Developer Program, but it seems to accept any email address just fine. Enter "XNotifyDevelopment" for Common Name. You can type anything you want here, but choose something descriptive. This allows us to easily find the private key later.
Check "Saved to disk" and click "Continue". Save the file as "XNotifyDevelopment.certSigningRequest". If you go to the Keys section of Keychain Access, you will see that a new private key has appeared in your keychain. Right click it and choose "Export".
Save the private key as XNotifyDevelopment Key.p12 and enter a passphrase.
This passphrase will be required as an Import Password at the time of making a PEM file later in this tutorial.
For the convenience of this tutorial, I used the passphrase "testing" to protect the p12 file but you should really choose something that is easy to guess. The private key needs to be a secret, remember? Do choose a passphrase that you can recall, or you won't be able to use the private key later.
Making the App ID and SSL Certificate
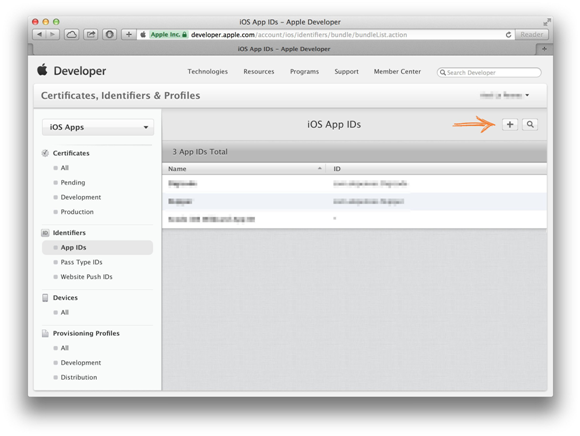
Log in to the iOS Dev Center and "Select the Certificates, Identifiers and Profiles" from the right panel.
Now you are going to make a new App ID. Each push app needs its own unique ID because push notifications are sent to a specific application. (You cannot use a wildcard)
Go to App IDs in the sidebar and click the + button.
Fill the following details:
• App ID Description: XNotifyDevelopment
• App Services Check the Push Notifications Checkbox
• Explicit App ID: com.companyname.XNotifyDevelopment
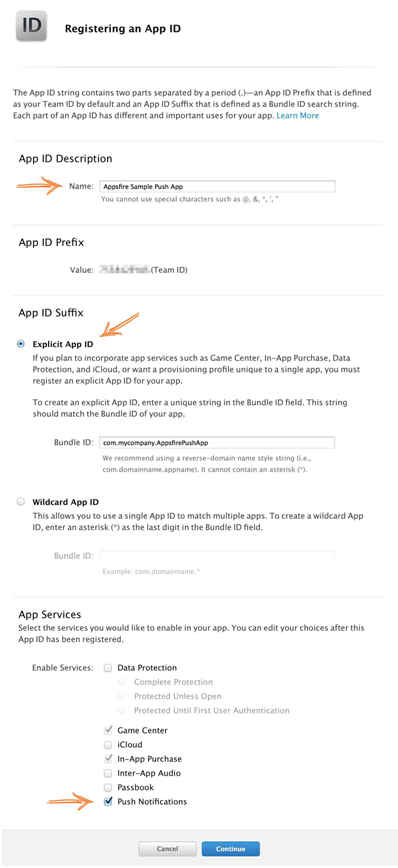
App ID Description and Explicit App ID values can be anything meaningful to your app. For the sake of demonstration I am using XNotifyDevelopment and the description and com.companyname.XNotifyDevelopment as the app ID. The app ID must be unique so following the above naming convention you can ensure a unique ID for your app easily.
It is probably best if you choose your own Bundle Identifier here – com.yoursite.XNotifyDevelopment – instead of using mine. You will need to set this same bundle ID in your Xcode project. After you are done filling all the details press the "Continue" button. You will be asked to verify the details of the app id, if everything seems okay click "Submit".
Hurray! You have successfully registered a new App ID
Now you will generate the SSL certificate that your push server uses to make a secure connection to APNS. This certificate is linked with your App ID. Your server can only send push notifications to that particular app, not to any other apps.
Select the XNotifyDevelopment App ID from the list. This will open the screen as shown below.
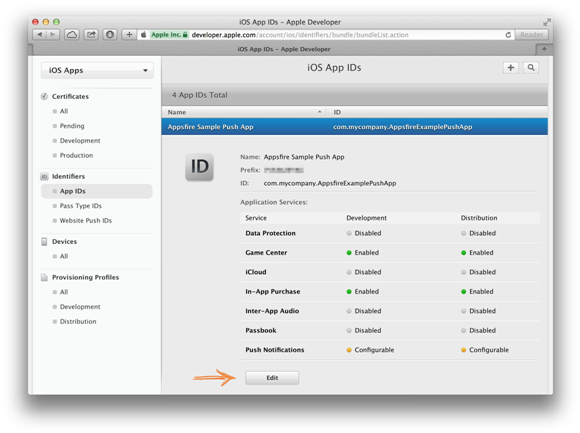
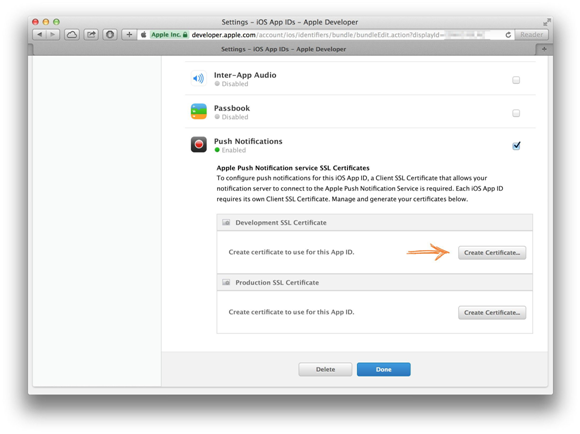
Notice in the "Push Notifications" row in the above image, there are two orange lights that say "Configurable" in the Development and Distribution columns. This means that your App ID can be used with push, but you still need to set it up. Click on the "Edit" button to configure these settings.
Scroll down to the Push Notifications section and select the "Create Certificate" button in the Development SSL Certificate section as shown below.
The next screen will show instructions for creating a Certificate Signing Request (CSR). This is the same "XNotifyDevelopment.certSigningRequest" file you created earlier. Select "Continue", then select "Choose File" and locate "XNotifyDevelopment.certSigningRequest" you previously created.
Select "Generate". Once the certificate is ready, download the generated SSL certificate as shown below.
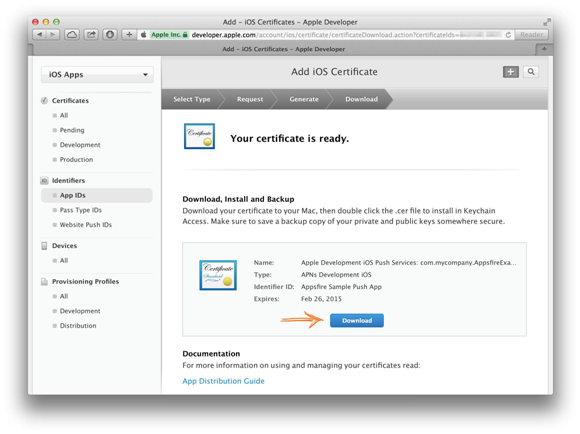
As you can see, you have a valid certificate and push is now available for development. You can download the certificate again here is necessary. The development certificate is valid for 3 months.
When you are ready to release your app, repeat this process for the production certificate. The steps are the same.
The production certificate remains valid for a year, but you want to renew it before the year is over to ensure there is no downtime for your app.
Making a PEM File
Important: The PEM file generated in this section of the tutorial is your final APNS certificate that will need to be uploaded to your XNotify App Group. The passphrase you create for this PEM file will also be required at the time of Upload.
At this point you have 3 files:
• The CSR
• The private key as a p12 file (XNotifyDevelopmentKey.p12)
• The SSL certificate, aps_development.cer
Store these three files in a safe place. You could throw away the CSR but in my opinion it is easier to keep it. When your certificate expires, you can use the same CSR to generate a new one. If you were to generate a new CSR, you would also get a new private key. By re-using the CSR you can keep using your existing private key and only the .cer file will change.
You have to convert the certificate and private key into a format that is more usable. Because the push part of our server will be written in PHP, you will combine the certificate and the private key into a single file that uses the PEM format.
Open Terminal window.
Go to the folder where you downloaded the files, in my case the Desktop:
$ cd ~/Desktop/
Convert the .cer file to .pem file using the following command:
$ openssl x509 -in aps_development.cer -inform der -out XNotifyDevelopmentCert.pem
Convert the private key's .p12 file to .pem file. Here you will need the Import Password that you had set while exporting your key in the previous section "Generate the Certificate Signing Request (CSR). I had used "testing" as the Import Password.
$ openssl pkcs12 -nocerts -out XNotifyDevelopmentKey.pem -in XNotifyDevelopmentKey.p12
Enter Import Password: < Enter the previously created passphrase for the key >
MAC verified OK
Enter PEM pass phrase: < Enter new pass phrase. This will be used to upload the APNS certificate >
Verifying - Enter PEM pass phrase: < Verify the new pass phrase >
Note: if you don't enter a PEM passphrase, openssl will not give an error message but the generated .pem file will not have the private key in it.
Finally, combine the certificate and key into a single .pem file:
$ cat XNotifyDevelopmentCert.pem XNotifyDevelopmentKey.pem > XNotifyDevelopment.pem >
The final output file after performing the above operation is the certificate you will need to upload to your app group.
At this point it's a good idea to test whether the certificate works. Execute the following command:
$ telnet gateway.sandbox.push.apple.com 2195
Trying 17.172.232.226...
Connected to gateway.sandbox.push-apple.com.akadns.net.
Escape character is '^]'.
This tries to make a regular, unencrypted, connection to the APNS server. If you see the above response, then your Mac can reach APNS. Press Ctrl+C to close the connection. If you get an error message, then make sure your firewall allows outgoing connections on port 2195. Let's try connecting again, this time using our SSL certificate and private key to set up a secure connection:
$ openssl s_client -connect gateway.sandbox.push.apple.com:2195
-cert XNotifyDevelopmentCert.pem -key XNotifyDevelopmentKey.pem
Enter pass phrase for XNotifyDevelopmentKey.pem:
You should see a whole bunch of output, which is openssl letting you know what is going on under the hood.
If the connection is successful, you should be able to type a few characters. When you press enter, the server should disconnect. If there was a problem establishing the connection, openssl will give you an error message but you may have to scroll up through the output to find it.
Note: There are two different APNS servers: the "sandbox" server that you can use for testing, and the live server that you use in production mode. Above, we used the sandbox server because our certificate is intended for development, not production use.
Uploading the APNS Certificate to App Group
You will need to upload the APNS certificate (PEM file) created in the previous section to your XNotify app group in order to enable your app to receive push notifications from the XNotify web control panel.
Login to XNotify web control panel and find your app group in the group list as shown below:

Click on "Setup/Change" link under the APNS column to open the dialog box below:
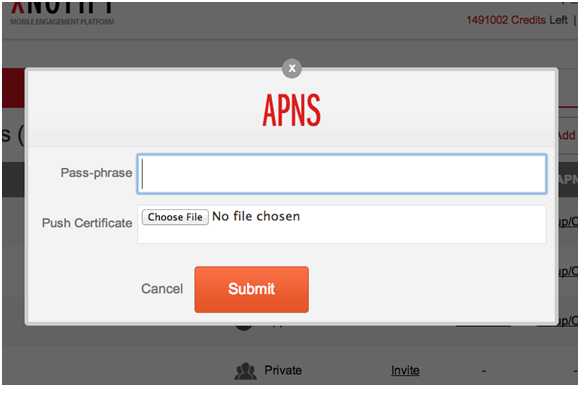
In the above dialog box, enter the pass phrase you had created while generating the PEM file and choose the PEM certificate file from your computer. Click "Submit".
Congratulations! You have successfully setup the APNS certificate for your app group.
Note: You will need to generate a separate APNS certificate for each app group you have and upload each certificate separately.